Sunday, 27 May 2012

Burger anyone? That is if you want Burger cookies


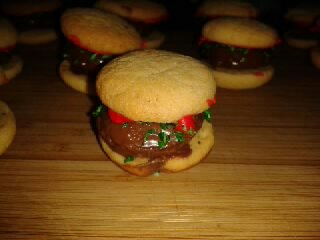
I have prepared those as yet another "Thank You" present. I wanted something original and not so classic as it is for a man. I had some Chocolate Shortbread dough ( you can find the recipe here: http://thebakingfrog.blogspot.co.nz/2012/05/say-thank-you-with-shortbread-cookies.html) left and I thought I should just try to make something out of it but I didn't want to make the same or similar cookies I usually make... And then it came to me, I will use the Chocolate Shortbread Cookies to make "meat patties" in a cookie burger.

I made Vanilla Wafers (recipe below), baked the Chocolate Shortbreads in a mini muffin pan, dipped them in milk chocolate, dyed some shredded coconut with green food colouring, made some Red Royal Icing and Bob's your uncle.

For the Vanilla Wafers: I have found the recipe on this site: http://bakingbites.com/2008/07/mini-vanilla-wafer-cookies/

Ingredients:
-1/2 cup of butter at room temp
- 1/2 cup of white sugar
- 1/4 cup of brown sugar
- 1 large egg
- 1 tsp vanilla
- 1 1/3 cup of flour
- 1/2 tsp of salt
- 1/2 tsp of baking powder

Preheat the oven to 325 Degree F (or 160 Degree C) and line the baking sheet with parchment paper.
Cream the butter and sugars until light. Beat in the egg and vanilla exctract.
Sift the flour, salt and baking powder over the butter mixture and stir to combine. Scrap dough into a pastry bag fitted with a plain pipping tip. My dough was too stiff so I used a teaspoon and roled the cookies into balls then flattened them a little.
Bake for about 15 minutes until cookies are a light golden brown.
Cool on a baking rack.

Assembly of the burgers:

1- Dip the shortbread in melted milk chocolate. Place them on a piece of parchment paper and leave in the fridge to set.
2- Pair up the vanilla wafers that will make your burgers. Choose the top and bottom.
3- Spread the bottom with a little melted chocolate.
4- Place the "patties" on the bottom of the burger.
5- Sprinkle the "green coconut" over the patties.
6- Spread the Red Royal Icing on the inside of the top of the burger and add a bit more "lettuce" to the outside.
7- Place the top of the burger over the patties.
8- Enjoy!!!!


Happy Baking everyone :)

Tuesday, 22 May 2012

Say "Thank You" with shortbread cookies, raspberry jam and chocolate fondant...

First the story behind those cookies.
On Sunday I lost my phone with some pictures and movies of my Son I hadn't had time to back up yet. I was devastated. So Sunday was mainly about contacting phone companies, and other agencies to have the number blocked, the GPS tracked and all that. On Monday, it appeared I had no choice but looking for another phone and kiss goodbye to those precious recorded moments with my Son. So I picked up my Husband from work, and off we went to the mall to acquire yet another device. With not much enthusiasm I got a new one and we made our way home for dinner.
We must have been home for a half hour when my Husband's phone rang and the "Miracle" happened. Some very nice people had found it on Sunday but it was out of battery so they recharged it all day on Monday and called to track down the owner. I was overjoyed!
We arranged to pick it up today at their place. I just could not show up with nothing. So I made those delicious chocolate shortbreads with a little dollop of raspberry jam covered with chocolate fondant. Something was still missing... The most important: "THANK YOU". 


So here is the recipe (inspired by Edmonds cookbook shortbread recipe):

Ingredients:
- 300g of butter at room temp.
- 1 cup of icing sugar
- 1 cup of cornflour
- 2 cup of plain flour
- 3/4 cup of cocoa powder
- Raspberry jam
- Chocolate fondant

Beat the butter and icing sugar until light and fluffy.

In another bowl, sift the flour, cornflour and cocoa powder together.

Add the above mix to the butter mixture. Knead until the dough comes together. I generally let my dough rest in the fridge for a little bit (no more than 30 minutes) just becasue I find that the dough is easier to manage. But that's only me.

Preheat your oven to 150Degree C.

On a lightly floured board, roll the dough out to about 1 cm thick. Cut with cookie cutter and place on a baking sheet.

Bake for 30 minutes. Be careful the shortbread are still very fragile. I would recommend not to touch them, instead handle them very delicately with a spatula or leave them alone for about 3 to 5 minutes once out of the oven until they "harden"a little. Place them onto a cooling rack until completely cool.

Prepare your fondant cut out. I made mine small squares. Cover the cookie side of the fondant with raspberry jam and stick it onto the cookie.


The more  I look at those, the more I like them even though this is not my best pipping work but mainly because my Son helped me make them from preparation to pipping. Thank you Honey Puff! 5KRQTXSQS2X4

Happy Baking everyone :)


Friday, 18 May 2012

Sliders and Chips for dinner

The sliders I made for my husband and mini sliders and chips for my son
My Husband has been wanting to eat sliders ever since we saw "Harrold and Kumar go to White Castle", which was roughly 6 years ago. We had rented the movie with no expectations and it became one of our favourites. My poor Hubby has been sick for the last week and yesterday he told me:"I'm feel like eating a burger, actually I really want a burger with chips and a chocolate milk shake". And I knew he meant business and if I didn't do anything about we would end up having take away food with its excessive salt, fat and cost.
I jumped off the sofa and declared: "There is no chance we will ever go to White Castle, so let's bring White Castle to us. I will make you the sliders you have been wanting for so long." Of course, this was a challenge. You generally cannot rival with the idea someone has made of something they have been craving for 6 years. But I was up to it.
I found a recipe of brioche buns on the following link and though that was the closest I would get to the ever- so wanted sliders. http://www.nytimes.com/2009/07/01/dining/011brex.html?_r=1.

Ingredients:
3 tablespoons warm milk
2 teaspoons active dry yeast
2 1/2 tablespoons sugar
2 large eggs
3 cups bread flour
1/3 cup all-purpose flour
1 1/2 teaspoons salt
2 1/2 tablespoons unsalted butter, softened.

Note: There is a waiting time of about 4 hours as they are 2 rises for those buns, however even with the cooler temperatures outside mine only took 30 to 45 minutes each because I had the oven on as well.

1. In a glass measuring cup, combine 1 cup warm water, the milk, yeast and sugar. Let stand until foamy, about 5 minutes. Meanwhile, beat 1 egg.

2. In a large bowl, whisk flours with salt. Add butter and rub into flour between your fingers, making crumbs. Using a dough scraper, stir in yeast mixture and beaten egg until a dough forms. Scrape dough onto clean, unfloured counter and knead, scooping dough up, slapping it on counter and turning it, until smooth and elastic, 8 to 10 minutes.

3. Shape dough into a ball and return it to bowl. Cover bowl with plastic wrap and let rise in a warm place until doubled in bulk, 1 to 2 hours.

4. Line a baking sheet with parchment paper. Using dough scraper, divide dough into 8 equal parts. I cut the dough into 4 and rolled into logs. I then cut the logs with the dough scraper in 12 balls. I still had some dough left to make the mini sliders. Gently roll each into a ball and arrange 2 to 3 inches apart on baking sheet (in a brownie dish if you want them small enough for sliders otherwise just on a baking sheet for normal burger buns). . Cover loosely with a clean kitchen towel and let buns rise in a warm place for 1 to 2 hours.

5. Set a large shallow pan of water on oven floor, I skipped this step since I baked them in my little convection oven and they turned out great. Preheat oven to 400 degrees (about 200 Degree C) with rack in center. Beat remaining egg with 1 tablespoon water and brush some on top of buns. Bake, turning sheet halfway through baking, until tops are golden brown, about 15 minutes. Transfer to a rack to cool completely.

This recipe made 12 sliders and about twice that in mini sliders

Mini sliders and chips for my little one
Apologies about the Bold below, my computer refused to format it.... Arggggg!
While the dough was rising for the second time, I prepared the meat. It was a very simple patty. I had some rump steak that I threw in the food processor with an onion cut in quarters, 3 cloves of garlic and a Tbsp of Barbeque sauce. I processed the lot and made them into patties. Generally I would leave them in the fridge for about 30 minutes to set but this time there was just no time. They tasted great still even withouth the rest time.
I pan fried them and slapped a slice of cheese over, back in the oven for 5 minutes just to melt the cheese a little and keep it in place on top of the patty.
I served it with homemade chips, and chocolate milkshake for the boys (made with my homemade chocolate bar) and a coconut, chai and vanilla milkshake for me.
I hope you enjoy those as much as my boys did.
Happy Baking everyone :)


Tuesday, 15 May 2012

Easy slow cooked pork chop chilli


On Monday I thought it would be a good idea to have pork for dinner. We bought those huge pork chops at our local butcher on the week end and one was enough for us 3.
But 3 pm came and I still had no idea what to do with that humengous defrosted pork chop starring at me from the bottom shelf of the fridge. Then, an epiphany! "Tonight we shall have chilli", I declared.
WARNING: this recipe takes a couple of hours.
So on with it.
Ingredients:
1/2 a brown onion, finely diced
2 cloves of garlic, smashed
1 Tbsp of oil (I used canola)
1 tin of tomatoes in their juice
2 cups of chicken broth
1 tsp of paprika
1/4 tsp of ginger
1/4 tsp of coriander
About 250g of pork
2 tins of beans (I used red kidney)
1Tbsp of brown sugar
Heat the oil in a oven proof dish (that has a lid or can be covered with aluminum paper) and fry the onions until translucent. Add the garlic and spices and cook until fragrant. Add the tomatoes, cook until bubbling and then add the broth.
Preheat your oven to 150° C.
Add the pork. (I actually put the whole chop in and because it cooked at low temperature for 2 hours, the meat fell off the bone.)
Place in the oven and leave it alone.
An hour to 45 minutes before serving, add your beans and about 1 Tbsp of brown sugar ( this helps balance the acidity of the tomatoes), stir and place it back in the oven for another hour approximately. Check on it regularly to make sure this is not catching at the bottom of the pan.
Serve with avocado, sour cream if you have some (I actually used cream cheese for the boys) and crusty bread.
Tip: I made up this recipe with what we had in the fridge and pantry. Those are pretty much essentials we always have around. I try my best to not go grocery shopping too often to save us some money. The only items I would tend to get regularly (not on grocery shopping day) are fresh fruits and veggies, bread and milk.
I trend to make up recipes with what I have rather than the other way around.
Happy cooking everyone:) and don't forget to join The Baking Frog on Facebook. Just click on the Like button at the top of the right column.

Monday, 14 May 2012

Facebook, here I come


Hi Baking Frog followers,
I now have a Facebook page where you can find links to the recipes, pictures and more as I go along. I am still in the process of updating it after a couple of frustrating hours on my laptop trying to link everything. I'm definitely better in the kitchen than behind the computer. I will be happy to count you as friends and maybe share some ideas and recipes.

Happy Baking everyone :) Hope to catch up with you soon on Facebook.


WE ARE LIVE ON FACEBOOK. You can like the page from here or go to Facebook, type The Baking Frog in the search  box and there you go!!! Hope to see you soon. Happy Baking everyone :)

Sunday, 13 May 2012

Chocolate tart with Raspberry jelly... No baking

Hmmmm, yummy!
I needed my little chocolate fix tonight. With time running out and my kitchen being monopolised by a roast dinner and 2 types of breads, I couldn't take too many risks. I still had a little bit of the chocolate truffles I made earlier in the week (and ate all by myself) so I decided to make a Raspberry jelly on top of a base made out of the truffles leftover. So really I had a divine dessert, my chocolate fix in just enough time to pour some boiling water over the jelly and leave it to cool.

You can find the truffle recipe here: http://thebakingfrog.blogspot.co.nz/2012/05/plate-of-little-treats-for-dessert-raw.html.

Just push it into a cake dish. Leave it in the fridge while you make the jelly. Once the jelly is cold enough, pour it over the base and leave in the fridge to set.


Happy baking everyone!!!

Gluten Free sandwich bread in the food processor

Despite all those cracks, it taste just right...
I thought it was not fair that the boys had bread with their dinner and I didn't. After all, it is Mother's Day. I only really had 45 minutes to come up with something and my computer's battery was running low, so I couldn't spend too much time looking for a recipe. I felt brave today, maybe it was the perfect day to remind me what I could do. I thought: "I gave birth, I can do anything". In those moments, more time than not I need to remind myself that this is not a good idea to try just about anything especially in the kitchen and when my well being is at stake but this time, against all odds, it worked. I have made a sandwich bread, that has the texture of one and that tastes like one. Only mistake, I made it in the wrong dish, hence having a flat sandwich bread. Don't be fooled by the cover, the inside is a real love story.

Ingredients:
- 1 1/3 cup of warm water
- 1 1/2 tsp of active dried yeast
- 1 tsp of honey
- 3/4 cup of brown rice flour
- 1 cup of sorghum flour
- 1/2 cup of potato starch
- 1/4 cup of millet flour
- 1/8 tsp of salt
- 2 eggs (I use size 7)
- 1 tsp of rice wine vinegar
- 2 Tbsp of coconut oil
- 2 Tbsp of honey


1- Spray a dish with oil.
2- Mix the warm water with the honey. Add the yeast, put it aside to froth.
3- In a large bowl, mix all the flours and salt.
4- In the bowl of your food processor (with your dough attachment), crack the eggs, add the vinegar, coconut oil and honey. Start wizzing away. Add the yeast mixture.
5- Stop the food processor and pour all the flour mixture. Wizz again until everything is well combined.
6- Dump the dough into the prepared tin, cover with a plastic film sprayed with oil as well and leave in a warm place to double in size.
7- Pre heat the oven to 200Degree C and bake the bread for about 25 minutes or until golden brown.


Happy Baking everyone :)