Showing posts with label Chocolate. Show all posts

Sunday, 10 June 2012

Quick, easy 3 or 4 ingredients choc pudding (in the microwave)

Took me a minute and 30 seconds to make this
decadent chocolate cake
Did I mention it is Gluten and Dairy Free too... And healthy???!!! Do not adjust your screen (or glasses) this is not a typo.

I came across this beauty when one night I made my son's pudding and got the time wrong on the microwave (must've been one of those nights).
Despite baking a lot I am not really resourceful when it comes to puddings for my little one. I just generally make him a chocolate porridge with pieces of dried fruitsor mashed banana. The purpose is mainly to get him full so we can all have a full night sleep. Did I mention he is a lazy eater?! This dessert works used to work fine for me. Now that he has tasted the 1 minute pudding, there is no going back.

So to the recipe (today also seems to be the ideal day to have one for afternoon tea since iti s cloudy and cold here)
For 1 person.

Spray a breakfast bowl with oil.

Ingredients:
-1/2 of oats (processed into flour)
- 2 tsps of baking cocoa (I have not tried with drinking cocoa powder but it should work, adjust the sugar they generally contain some as well as milk powder)
- 2 tsps of agave syrup (or honey)
- 3 Tblsps of soy milk approx

Mix all the dry ingredients. Add the milk and mix until it ressembles a thick cake batter. You may require some more milk.

Spray a breakfast bowl or ramekin (if you don't want yours to look flat and miserable like mine). Pour the mixture in the bowl and microwave for 1 minute. It generally only takes that long, however if you have put too much milk you might see that it is not completely cooked, so put it back in the microwave for another 30 seconds.

Enjoy it!!!! It tastes really decadent and give you an immediate chocolate fix.

Variations:
I made this for my little one last night except I added half a mashed banana and reduced the milk a little. It was very nice and almost the whole bowl was devoured.
I also made mine (pictured) with coconut milk instead of soy milk. It was delicious! It tasted rich and the coconut milk definitely brought the chocolate flavour out. I ate 3/4 of it and just finished the rest as I was typing this recipe and it taste very nice, very nice indeed.

Make this is a big bowl with a chocolate ganache or some cream on the side next time you have guests and let them think you have been sweating over a hot oven all day, they won't taste the difference.

Looking around for similar recipes after my first and I have found a very similar recipe om Chocolate Covered Katie if you wanted to try this one as well: http://chocolatecoveredkatie.com/2012/01/19/single-serving-mocha-chocolate-cake/ with a few more ingredients and a different variation on flavour.

Happy Baking everyone :)

Friday, 1 June 2012

Oatmeal brownies (Gluten and Dairy Free)

Well the story started last night with pudding for my son. He loves pudding so much that my Husband and him have a song for it, and when that song starts they both mean business.
My Husband made last night's pudding and mixed some oats, dried apricots, peanut butter and chocolate. My son LOVED it!!!
In fact he loved it so much that I made the same for Breakfast but I thought I could take this little bowl of yummy porridge to something more decadent (at least in taste but not in calories).  This is sure to satisfy any chocolate cravings without having to worry about the scale the next day.Without further a do, here is the recipe:

Ingredients: (makes about 12 brownies)
- 1 cup of porridge
- 1 cup of boiling water
- 3 Tbsp of cocoa powder
- 2 tsp of coconut oil, melted
- 1 tsp of peanut butter
- 5 dried apricots (optional)
- 1 Tbsp of agave sugar (or honey or maple syrup)
- 1 banana, mashed
- 1 Tbsp of milk (I used Almond Milk)

For this recipe I processed the porridge into a flour but it should work without this step.

Pre- heat the oven to 200 Degree C.

In a bowl mix porridge and cocoa powder. Add the boiling water and let the mixture absorb it.
Mix the coconut oil with the peanut butter to losen it. Mix all the ingredients to the oats mixture.

If the mixture seems to "dry" or hard to work with, add more milk. It should be a smooth batter, kind of ike a cake batter.

Pour the mixture in either a cake pan (buttered or oiled) or muffin pan (butterer or oiled unless using a silicone one as I did).

Bake until a skewer inserted in the middle comes out clean (mine took about 30 minutes but I realised 15 minutes in that my little kitchen hand changed the oven temp to 150 Degree C).

Take them out of the oven and leave them to cool a little before taking them out.

You can serve them just as is or you can add a topping. I made mine Rocky Road.


Rocky Road Topping:
- 1 tsp of coconut oil
- 2 Tbsp of cocoa powder
- Some agave sugar to taste
- 1 Tbsp of milk (I used Almond milk)
- Mini Marshmallows
- Peanuts cut into pieces

Melt the coconut oil in the microwave (add the milk if you are just taking it out of the fridge).

Mix it the cocoa powder. Add teh agave sugar to taste (I think I only put about 2 tsp).

Mix the marshmallows and peanuts and "dump" the frosting over the brownies.

I added some white chocolate drops on the boys' simply because they love it. My little munchkin LOVED it almost as much as the pudding his Daddy made him the night before :)

Happy Baking everyone :)


Sunday, 27 May 2012

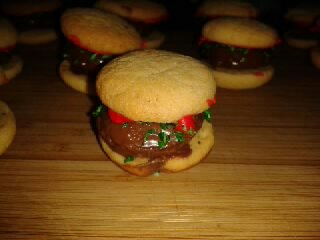
Burger anyone? That is if you want Burger cookies


I have prepared those as yet another "Thank You" present. I wanted something original and not so classic as it is for a man. I had some Chocolate Shortbread dough ( you can find the recipe here: http://thebakingfrog.blogspot.co.nz/2012/05/say-thank-you-with-shortbread-cookies.html) left and I thought I should just try to make something out of it but I didn't want to make the same or similar cookies I usually make... And then it came to me, I will use the Chocolate Shortbread Cookies to make "meat patties" in a cookie burger.

I made Vanilla Wafers (recipe below), baked the Chocolate Shortbreads in a mini muffin pan, dipped them in milk chocolate, dyed some shredded coconut with green food colouring, made some Red Royal Icing and Bob's your uncle.

For the Vanilla Wafers: I have found the recipe on this site: http://bakingbites.com/2008/07/mini-vanilla-wafer-cookies/

Ingredients:
-1/2 cup of butter at room temp
- 1/2 cup of white sugar
- 1/4 cup of brown sugar
- 1 large egg
- 1 tsp vanilla
- 1 1/3 cup of flour
- 1/2 tsp of salt
- 1/2 tsp of baking powder

Preheat the oven to 325 Degree F (or 160 Degree C) and line the baking sheet with parchment paper.
Cream the butter and sugars until light. Beat in the egg and vanilla exctract.
Sift the flour, salt and baking powder over the butter mixture and stir to combine. Scrap dough into a pastry bag fitted with a plain pipping tip. My dough was too stiff so I used a teaspoon and roled the cookies into balls then flattened them a little.
Bake for about 15 minutes until cookies are a light golden brown.
Cool on a baking rack.

Assembly of the burgers:

1- Dip the shortbread in melted milk chocolate. Place them on a piece of parchment paper and leave in the fridge to set.
2- Pair up the vanilla wafers that will make your burgers. Choose the top and bottom.
3- Spread the bottom with a little melted chocolate.
4- Place the "patties" on the bottom of the burger.
5- Sprinkle the "green coconut" over the patties.
6- Spread the Red Royal Icing on the inside of the top of the burger and add a bit more "lettuce" to the outside.
7- Place the top of the burger over the patties.
8- Enjoy!!!!


Happy Baking everyone :)

Sunday, 13 May 2012

Chocolate tart with Raspberry jelly... No baking

Hmmmm, yummy!
I needed my little chocolate fix tonight. With time running out and my kitchen being monopolised by a roast dinner and 2 types of breads, I couldn't take too many risks. I still had a little bit of the chocolate truffles I made earlier in the week (and ate all by myself) so I decided to make a Raspberry jelly on top of a base made out of the truffles leftover. So really I had a divine dessert, my chocolate fix in just enough time to pour some boiling water over the jelly and leave it to cool.

You can find the truffle recipe here: http://thebakingfrog.blogspot.co.nz/2012/05/plate-of-little-treats-for-dessert-raw.html.

Just push it into a cake dish. Leave it in the fridge while you make the jelly. Once the jelly is cold enough, pour it over the base and leave in the fridge to set.


Happy baking everyone!!!

Tuesday, 8 May 2012

Plate of little treats for dessert: Raw truffles (with chocolate), flourless oat cookies and mini GF donghnuts...

The content of this plate no longer exists. Nom, Nom, Nom!
Starting from the left of the plate, clockwise: flourless oats cookies,
mini GF doughnuts and raw truffles


Since I have been on my GF and DF diet I have found that I am becoming more of a sweet tooth; or maybe it's just age. Anyway, I find myself much more often craving for sweets, from the innocent dried fruit to the naughty chocolate bar in the pantry. So I try to make and find recipes that are made with natural ingredients and somehow healthy. Tonight I made 3 treats in mini sizes so we could all have a little bit of everything. Despite my love for chocolate, I must admit the mini doughnuts keep teasing me and I have found it hard to resist them (I had much more than what's on the plate).

For the Flourless oats cookies: (I have used the recipe from the fabulous chocolatecoveredkatie: http://chocolatecoveredkatie.com/2012/02/20/flourless-oatmeal-raisin-cookies/).

3/4 cup rolled oats
1/4 tsp baking soda
1/8 tsp salt
2 T brown sugar (I used cane sugar)
1 T plus 2 tsp white sugar or evaporated cane juice (I used agave nectar)
2 T raisins
1 T oil or pre-melted margarine
1-2 T milk of choice (start with 1)

Blend first 5 ingredients together in a food processor or blender. Mix Process with other ingredients, form into cookie shapes, and place on a greased cookie sheet. Cook 6 minutes at 375 F.
Those cookies are crunchy and sweet and just taste so nice.

For the mini GF doughnuts: (original recipe from http://www.browneyedbaker.com/2010/08/27/monkey-bread-recipe/) This is actually a monkey bread recipe and if you follow the link you can watch the recipe step by step.

Total Prep Time: 1 hour | Total Rise Time: 2 hours | Bake Time: 35 minutes

Dough:
4 tablespoons unsalted butter (I used coconut oil), divided, 2 tablespoons softened and 2 tablespoons melted
1 cup milk, warm (about 110 degrees F)
1/3 cup water, warm (about 110 degrees F)
¼ cup granulated sugar Cane sugar
1 package instant yeast
3¼ cups all-purpose flour, plus extra for work surface (To make it Gluten Free I used Orgran Gluten Free All- Purpose flour http://www.orgran.com/products/160/)
2 teaspoons salt

Brown Sugar Coating:
1 cup light brown sugar (cane sugar)
2 teaspoons ground cinnamon
8 tablespoons unsalted butter (1 stick), melted 5 Tablespoons of vanilla infused grapeseed oil- Equagold, http://equagold.co.nz/EquagoldProducts/tabid/6228/CategoryID/0/List/0/Level/a/ProductID/84/Language/en-US/Default.aspx?SortField=ProductName%2cProductName.

Glaze*:
1 cup confectioners’ sugar
2 tablespoons milk

*I have not made the glaze because I am thinking of trying of few different topping over the next couple of days... or maybe a chocolate fondue.

1. Butter flat dish with 2 tablespoons softened butter (or coconut oil if using). Set aside.

2. In a large measuring cup, mix together milk, water, melted butter, sugar and yeast. Mix flour and salt in standing mixer fitted with dough hook. Turn machine to low and slowly add milk mixture. After dough comes together, increase speed to medium and mix until dough is shiny and smooth, 6 to 7 minutes. Turn dough onto lightly floured counter and knead briefly to form smooth, round ball. Coat large bowl with nonstick cooking spray. Place dough in bowl and coat surface of dough with cooking spray. Cover bowl with plastic wrap and place in a draft-free area until dough doubles in size, 50 to 60 minutes.

3. For the sugar coating: While the dough is rising, mix brown sugar and cinnamon together in a bowl. Place melted butter (or oil) in second bowl. Set aside.

4. To form the bread: Gently remove the dough from the bowl, and pat into a rough 8-inch square. Using a bench scraper or knife, cut dough into 64 pieces.

5. Roll each dough piece into a ball. Working one at a time, dip the balls into the melted butter, allowing excess butter to drip back into the bowl. Roll in the brown sugar mixture, then layer balls in the Bundt pan, staggering seams where dough balls meet as you build layers (or if like me you do not want the layers, place them in a single layer on the flat dish).

6. Cover the pan tightly with plastic wrap and place in draft-free area until dough balls are puffy and have risen 1 to 2 inches from top of pan, 50 to 70 minutes.

7. Preheat oven to 350 degrees F. Unwrap the pan and bake until the top is deep brown and caramel begins to bubble around the edges, 30 to 35 minutes. Cool in the pan for 5 minutes, then turn out onto a platter and allow to cool slightly, about 10 minutes.

8. For the glaze: While the bread cools, whisk the confectioners’ sugar and milk in a small bowl until the lumps are gone. Using a whisk, drizzle the glaze over the monkey bread, letting it run over top and down the sides of the bread. Serve warm.

For the raw truffles: http://www.sweetlyraw.com/2012/04/raw-vegan-chocolate-mint-cake.htm.3 cups almonds
2 cups pitted dates
2/3 cup raisins
1/2 cup cacao powder
2/3 cup pecans pine nuts
1/8 teaspoon salt
1 teaspoon pure vanilla
1-2 teaspoons water, as needed

Grind almonds in a food processor. Transfer to a bowl.
Puree the dates and raisins in the food processor until smooth (or as smooth as you can get it).
Add the ground almonds, cacao powder, pecans, vanilla, and salt to the date puree and process to bring all ingredients together into a dough.
Press a bit of the dough in your hand. If it's still crumbly, add 1 teaspoon water (it will probably need it). Process again. Add a bit more water if needed.
Press the dough into a container and leave in the fridge to set for at least 30 min.

This recipe is actually a cake. I will try to make the cake myself because it looks delish! However, in treat sizes, everytime you need a chocolate hit, you just need to walk to the fridge and not feel so guilty. Of course there is quite a bit of fat in this BUT those are good fats and the sweetness comes from the dried fruits, no added sugar.

Happy Baking everyone :)


Saturday, 5 May 2012

Banana chocolate roll


Ok I admit this is not much of a recipe but if you crave a warm chocolatey dessert (that is gluten free as well) this is for you.
I had made some buckwheat crepes earlier in the week and froze them. They do freeze well however I had folded them and they broke at the fold so next time I will freeze them flat. You can find the recipe here: http://thebakingfrog.blogspot.co.nz/2012/05/gluten-and-dairy-free-stuffed-crepes.html.

I spread each one with the nut and dark chocolate butter I had made earlier as well (http://ohsheglows.com/2011/01/12/4-ingredient-dark-chocolate-almond-butter/) but any type of spread is ok.

I rolled the banana in the chocolate spread crepe and put them in the oven for 20 minutes at 180C. The edges became crispy and the banana was nice and soft in the middle.

I then melted some more chocolate in the microwave (I used Toblerone) and drizzle (or slapped) it on the crepes.

You should have seen the joy in my son's eyes when he realised that was dessert. Apparently I was not being fast enough with the fork feeding him so he would just reach his little hand and was grabbing some pieces himself.


My husband's verdict: he needed at least another 6 servings to be able to tell me if he liked it or not (He! He!) and it would have been even better with vanilla ice cream....

Happy Baking everyone :)

Tuesday, 1 May 2012

Toblerone crinkles

I saw those cookies on many baking websites and I always wanted to try them. For some reason I thought they were very difficult to make so I kept putting it off. The most difficult thing is in fact the wait. Those aren't really biscuits you can make in a dash when an unexpected guest is at your door. They need to rest in the fridge to be able to roll them into balls before baking them. But I get ahead of myself, here is the recipe from one of my favourite baking site: Joy of baking. There is even a video: http://www.joyofbaking.com/ChocolateCrinkles.html.

The only difference is that I used the massive Toblerone my sister- in law had given me. It also added texture to the cookies because of the pieces of nuts in the bar.

Ingredients:
- 4 Tbsp of unsalted butter
- 230g of Toblerone
- 1/2 cup of granulated white sugar
- 2 large eggs (I used size 7)
- 2 tsp of pure vanilla
- 1 1/2 cup of all- purpose flour
- 1/4 tsp of salt
- 1/2 of baking powder

Topping:
- 1 cup of icing sugar


In a heatproof bowl, place over a saucepan of simmering water, melt the chocolate and butter. Remove from the heat and let cool to room temperature.


In the bowl of an electric mixer, fitted with the paddle attachment, beat the eggs and sugar until thick, pale and fluffy (about 3 to 5 minutes). Then beat in the vanilla extract. Add the cooled chocolate mixture and beat until incorporated. 


In a separate bowl whisk together the flour, salt and baking powder. Add the dry ingredients to the chocolate mixture stirring just until incorporated. Cover with plastic wrap and refrigerate until firm enough to shape into balls (I left mine overnight).

When ready, preheat the oven to 325 F or 165 C and place the rack in the centre of the oven. Line two baking sheets with parchment paper.

Place the icing sugar in a shallow bowl. Roll the chilled dough into 2.5cm balls and roll each ball in the sugar. Make sure each ball is completely coated, with no chocolate showing through. Place the sugar covered balls on the prepared baking sheet, spacing about 5 cm apart.

Bake cookies for about 8 to 10 minutes or just until the edges are slightly firm but the centres are still soft.


And the result is:


The ones on the last pic are tiny ones I have made for my son. Needless to say they were enjoyed by many, including my niece and nephew. 


Happy Baking everyone :)

Friday, 6 April 2012

Easter Toblerone Hot Cross Buns


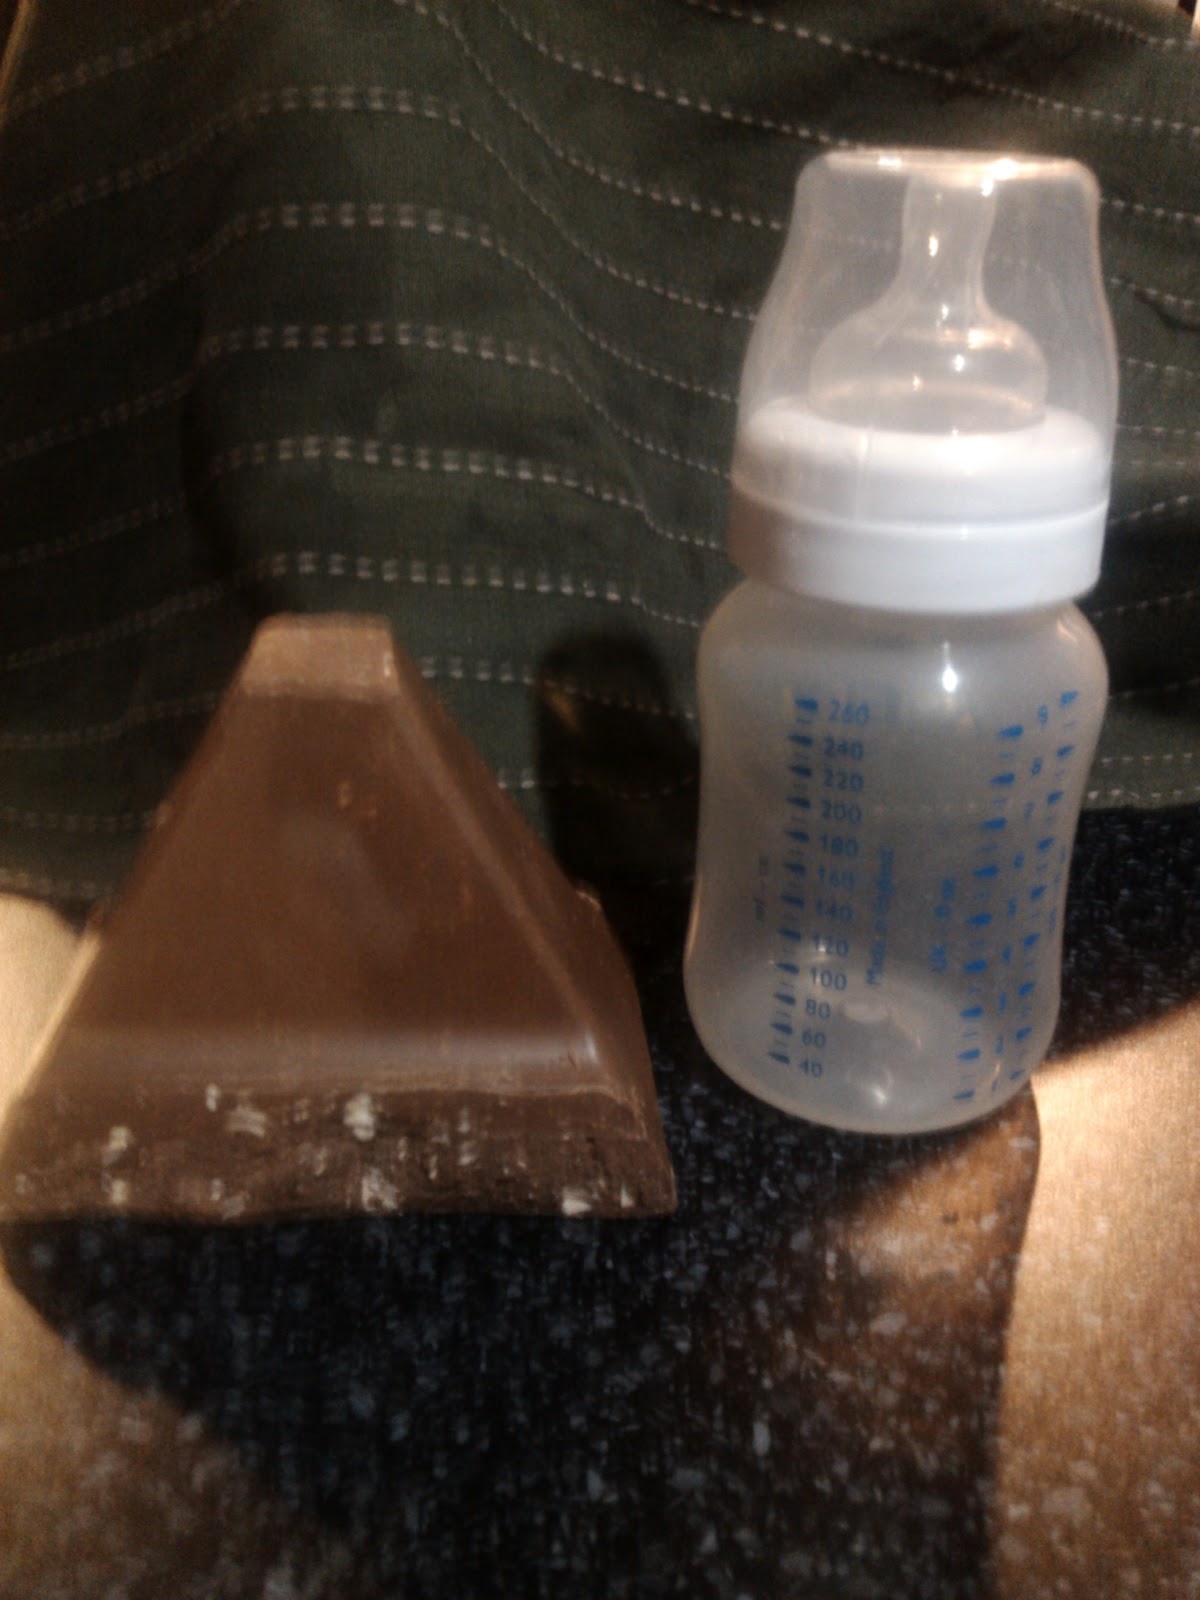
Last week my sister- in law came for a visit and brought me the 2 biggest pieces of Toblerone I have ever seen. I thought the ones you buy at the airport were the biggest you could find but was I wrong! Those ones are humengous!!!
Don't believe me??
I didn't have anything else for comparison than my son't bottle. But I guess it shows how big that one piece of Toblerone is!!!

Anyway, I made those special Hot Cross Buns for her and her beautiful family. I followed the Edmonds recipe with a few changes.

Ingredients:
1 1/2 cups of milk
1 teaspoon of sugar
1 tablespoon of butter
2 teaspoons Edmonds active yeast
4 1/2 cups Edmonds high grade flour
1 teaspoon salt
1 teaspoon cinnamon
1/2 teaspoon mixed spices
1/2 teaspoon ground nutmeg
2 teaspoons sugar
1 3/4 cups of mixed dried fruit
1 cup of tea (mine was lemon flavoured)
100g of chopped Toblerone

Crosses:
1/2 cup Edmonds high grade flour
3 Tablespoons of cacao powder
6 Tablespoons of water

Glaze:
1 Tablespoon sugar
1 Tablespoon boiling water
1 teaspoon gelatine

Heat the milk until almost boiling. Stir in the first measure of sugar and butter until butter melts. Set aside until lukewarm. Sprinkle yeast over and leave in a warm place for 15 minutes or until frothy.

Put the dried fruit is a bowl and pour the hot tea over. Leave aside until needed.

Combine 4 cup of flour with salt, cinnamon, mixed spices and nutmeg in a bowl. Stir in second measure of sugar. Make a well in the centre of the dry ingredients.

Pour the yeast mixture in. Beat to a soft dough, adding more flour if the dough is sticky.

Drain the fruit and add them to dough along with the pieces of Toblerone.

Turn onto a lightly floured board. Knead until smooth and elastic or until the dough springs back when lightly touched.

Lightly brush a bowl with oil. Place the dough in the bowl. Brush the top with oil. Cover and leave in a warm place until doubled in size.

Punch the dough in the centre and knead lightly. Divide the mixture into 16 even- sized pieces. Shape into balls. Place the balls 2 cm apart on a greased oven tray. Cover and leave in a warm place until doubled in size.

Pipe the crosses on each bun.

Bake at 200 Degree C for 20 minutes or until golden. Remove from the oven and brush with the glaze. Cool on a wire rack.

To make the crosses:
Mix together all the ingredients until obtaining a smooth paste. Place the mixture into a small plastic bag and snip one of the corners.

To make the glaze:
Boil the water and mix together with the sugar and gelatine until all dissolved. Brush onto the Hot Cross Buns.


Thursday, 15 March 2012

Chocolate cake for my sister- in- law's Birthday


It was my Sister-in law's Birthday last week end and I though I would make her a nicely decorated cake. I thought I would make a chocolate cake with chocolate ganache and some simple yet elegant decorations. 
I got the recipe from one of my favourite baking sites: http://www.joyofbaking.com/ChocolateBananaCake.html.

Chocolate Banana Cake:


2 cups (400 grams) granulated white sugar
1 3/4 cups (245 grams) all-purpose flour
3/4 cup (75 grams) unsweetened cocoa powder (regular or Dutch-processed)
1 1/2 teaspoons baking powder
1 1/2 teaspoons baking soda
1/2 teaspoon salt
2 large eggs
1 cup mashed ripe bananas (about 2 medium sized bananas)
1 cup (240 ml) warm water
1/2 cup (120 ml) milk
1/2 cup (120 ml) corn, safflower or canola oil (or other flavorless oil)
1 1/2 teaspoons pure vanilla extract


Chocolate Banana Cake: Preheat oven to 350 degrees F (180 degrees C) and place rack in the center of the oven. Butter, or spray with a non stick vegetable spray, either a 9 x 13 inch (23 x 33 cm) pan or in my case 2 small round cake pans. Set aside. 
In a large bowl whisk together the sugar, flour, cocoa powder, baking powder, baking soda, and salt. Set aside.
In another large bowl, whisk together the eggs, mashed bananas, water, milk, oil, and vanilla extract. Add the wet ingredients to the dry ingredients and stir, or whisk, until combined. You will notice that the batter is quite thin. Pour the batter into the prepared pan and bake for about 35 to 40 minutes or until a toothpick inserted in the center of the cake comes out clean.  
Remove from oven and let cool on a wire rack. When completely cooled, frost with the Ganache.

For the Ganache
150ml of cream
2 cups of dark chocolate chips or pieces of chocolate cut in small pieces
1 teaspoon of butter (to make it glossy)

Prepare the chocolate in the medium size heatproof bag. Bring the cream just to the boil. Pour onto the chocolate. Add the butter. Let is all melt for a couple of minutes. Stir slowly until the mix is all smooth and shiny. Let it cool  until it gets thick enough to be easily spread.

Chocolate Banana Cake: Preheat oven to 350 degrees F (180 degrees C) and place rack in the center of the oven. Butter, or spray with a non stick vegetable spray, a 9 x 13 inch (23 x 33 cm) pan. Set aside. 
In a large bowl whisk together the sugar, flour, cocoa powder, baking powder, baking soda, and salt. Set aside.
In another large bowl, whisk together the eggs, mashed bananas, water, milk, oil, and vanilla extract. Add the wet ingredients to the dry ingredients and stir, or whisk, until combined. You will notice that the batter is quite thin. Pour the batter into the prepared pan and bake for about 35 to 40 minutes or until a toothpick inserted in the center of the cake comes out clean.  
Remove from oven and let cool on a wire rack. When completely cooled, frost with the Ganache.

Assembly 
Once the cakes are completely cool. Cut horizontally in half. Pour some of the cold ganache and spread to about 0.5cm from the edges of the cakes. 
Ice the biggest cake fully. Place the smallest one over (I didn't use any dowels as the cakes were small and the ganache fairly sticky). Ice the top cake. You can let the ganache drip on the second cake as well. Put the cake in the fridge for about an hour.
Once an hour has past the ganache should be "hard"enough. Boil some water and place it in a bowl or a plunger. Using a palette knife, you will "hot knife" the ganache to make it look more even. Plunge the palette knife in the hot water, dry it with a paper towel or hand towel and smooth the cakes. The heat will make the ganache melt a little and you will be able to give your cakes a better finish.


Add the decorations of your choice. I just placed some Royal Icing roses I had made the night before.

Here are a few more pics of the one I made. 


Sunday, 15 January 2012

And for Christmas I also made some... Chocolate dipped Hazelnuts Shortbreads

I wanted to make shortbread but not the ones I usually make during the year. I wanted the Wow factor and I found this recipe on the Food Network website: http://www.foodnetwork.com/recipes/dave-lieberman/chocolate-dipped-hazelnut-shortbread-recipe/index.html.

Ingredients

Directions

Preheat oven to 350 degrees F.

Place hazelnuts on baking sheet. Bake until they're a shade darker and fragrant, about 10 to 15 minutes. Remove from oven and set aside to cool.

Lower oven to 325 degrees F.
Place hazelnuts in blender or food processor and pulse to coarse bits; set aside. Whisk together flour, baking powder, and salt to blend; set aside.

Beat butter and sugar together with a wooden spoon until smooth. Beat in egg. Gradually beat the flour mixture into the butter mixture. Add the chopped hazelnuts and mix until distributed evenly throughout.

Form into long cookies and place on greased cookie sheets. Bake until firm, about 15 minutes. Remove from oven and cool on racks.

In a saucepan over lowest heat or in a double boiler, melt chocolate. Dip 1 end of cooled cookies into melted chocolate. Place back on cookie sheet to harden.

I shaped mine in stars. I thought that was more Christmassy :) Although I realized as I didn't take any pics of the shortbreads once they were dipped... Well, will have to make them again.


Happy Baking :)


Friday, 9 December 2011

Double chocolate, almonds and marshmallow fudge

I have found this recipe by chance and re- arranged it with a few different ingredients. You can find the basic recipe on: http://southernfood.about.com/od/fudgerecipes/r/r71221c.htm.

ngredients:

  • 1 can sweetened condensed milk. I only had 3/4 of one and it worked fine. However I have to make some more so I will try with a full cup this time.
  • 2 cups semisweet chocolate chips
  • 1 cup milk chocolate chips
  • 2 tablespoons butter
  • 1 teaspoon vanilla
  • 1 cup of chopped almonds, marshmallow and dried cranberries. I thought that sounds like Christmas.

Preparation:

Lightly grease a 9-inch square pan; line with a piece of plastic wrap about 18 to 24 inches in length, leaving the ends out to cover the finished fudge. The ends will also serve as "handles" which will help you lift the fudge out of the pan. Heat the condensed milk, chocolate chips, butter, and vanilla in a double boiler over simmering water. Stir until the chocolate is melted and mixture is smooth. Stir in almonds, marshmallows and cranberries; pour into the prepared pan. Spread gently then cover lightly with the ends of the plastic wrap. Chill until firm. Lift out of the pan and cut into small squares.


Those pictures are of poor quality I know. I have to make some on the week end so I will post some better ones, but trust me this fudge is easy as pie and tastes divine. 

Monday, 21 November 2011

Chewy Peanut Butter, Choc Chip, Banana and Almonds cookies


Ok I admit that seems like a lot of ingredients but they taste very nice and are sort of healthy. I have found the recipe on the Healthy Food Guide website: http://www.healthyfood.co.nz/recipes/2010/august/chewy-peanut-butter-and-chocolate-cookies and I had some bananas lying around so I decided to add one to the biscuits and reduce the sugar. So here it is:

  • 1 cup peanut butter
  • 1 egg
  • 3/4 cup brown sugar
  • 1/2 teaspoon baking soda
  • 85g dark chocolate, chopped in chunks
  • 1 mashed banana
  • A handful of almonds, cut into pieces
Preheat oven to 180°C. Combine peanut butter, egg, sugar and baking soda, the almonds and the banana in a bowl. Mix well. Add chocolate. Stir to combine.
Line a baking tray with baking paper. Using hands, shape teaspoonfuls of mixture in balls and place on tray about 5cm apart.Now that's where the execution is different if you are using my variation. The mixture will be too wet to roll the cookies into balls so use a spoon.
Bake for 10-12 minutes until lightly browned on top. Allow to sit on tray for a few minutes in oven, before removing to cool.

Wednesday, 5 October 2011

The dreaded Chocolate Macaroons


I made macaroons about 4 times before. The first time was for my Baby Shower (in May 2010). I didn't know that the whole thing could so easily go wrong when I first made them so obviously they turned out perfect! And when I was fooled into a sense of false security I tried again and they turn out awful. They either didn't cook properly or I couldn't take them off the baking paper.
One thing that people who know me well would definitely agree with is that I don't give up easily and sooner or later I will succeed!!! Some might even say that I am stubborn (wonder where they would get that from???)
SO I made another attempt and "Victory"...

I got the recipe (for every attempts) from "The Australian Women's Weekly, Macaroons and Biscuits":
Ingredients for the Macaroons:
3 egg whites
1/4 cup of caster sugar
1 cup of icing sugar
1/4 cup of cocoa powder
 1 cup of ground almonds
2 teaspoons of cocoa powder (extra for dusting)

Ingredients for the chocolate ganache filling:
1/4 cup of pouring cream
150g dark eating chocolate, chopped finely (I grate mine just to be sure)


To make the Macaroons
1- Grease an oven tray; line with baking paper. I use a cookie tray and I have not actually greased it beforehand. The baking paper is enough.
2- Beat the egg whites in a small bowl with electric mixer until soft peaks form. Add caster sugar, beat until  sugar dissolves; transfer mixture to a large bowl (mine was already big so I kept that one). Fold in the sifted icing sugar and cocoa, and ground almonds in two batches.
3- Spoon the mixture into a pipping bag fitted with 2cm plain tube. (At this stage, I use a little amount of the mixture to the baking paper to the tray, on that same day I made some meringue and I have taken a picture of it so check the "Meringues" post). Pipe 4 cm rounds about 2 cm apart onto the trays. Tap the trays on the bench so the macaroons spread slightly. Dust with extra sifted cocoa (It was getting late and I forgot that step); stand for 30 minutes (for them to crust).
4- Meanwhile preheat the oven to 150 Degree C.
5- Bake the macaroons about 20 minutes. Cool on trays.


To make the ganache:
Bring the cream to the boil in a small saucepan, remove from heat; add the chocolate, stir until smooth. Refrigerate about 20 minutes or until spreadable.

Sandwich macaroons with the chocolate filling.


I ran out of ganache so I made about 3 of them with Nutella instead. No complaints from what I have been told.

Friday, 23 September 2011

Chocolate and Dulce De Leche layer cake

My beloved niece Ataraiti is leaving in a couple of days for her OE so we went to say Goodbye today. I wanted to make something special for her so I created this cake. It's a 2 layer chocolate cake with homemade Dulce De Leche in the middle and buttercream Dulce De Leche icing, topped with Maltesers. We couldn't stay for dinner so at this stage I am not sure how it went but I have tasted all the elements separately and I was pretty happy with them so fingers crossed.

Right let's get to the recipe:

For the cake: (recipe take from the book "500 cakes" by Susannah Blake that my wonderful Sister- in Law and Brother gave me).


- 170g of butter, at room temperature (if you have forgotten to take the butter our of the fridge then try grating it)
- 140g caster sugar (for some reason I put 100g of caster sugar and the rest was brown sugar)
- 3 eggs
- 140g self- raising flour
- 3 tbsp unsweetened cocoa powder

Preheat the oven to 180C. Grease two 20 cm round cake tins and line the bottoms with greaseproof paper. (I just sprayed my tins with neutral oil spray).

Beat together the butter and sugar until pale and fluffy. Beat in the eggs one at a time. Sift the flour and cocoa over the top, then fold in.

Spoon the batter into the prepared tins and spread out evenly using the back of a spoon. It will look like there is not enough batter for the pan but persevere, it'll work.

Bake for 20 to 25 minutes until a skewer inserted in the center comes out clean.

Then a tip I have pinched from Bakerella: let the cakes cool enough to be able to handle them and get them out of the pan. Once that's done, wrap them in cling film so lock in the moisture.


For the Dulce De Leche: (www.joyofbaking.com)


This recipe makes about 1 cup and a quarter.
There are 3 different ways to make Dulce De Leche. 1 with the tin of condensed milk in the oven, another one still with condensed  milk but this time in saucepan filled with water and the last one by combining and cooking all the ingredients. I chose the last one, mainly because I didn't have any condensed milk and the end product was phenomenal!

Ingredients:
- 4 cups of whole milk
- 3/4 cup (150g) granulated white sugar
- 2 tbsp light corn syrup (I have never found corn syrup in New Zealand so I use glucose which can easily be found in supermarket)
- 1/2 tsp baking soda
- 1/8 tsp of salt
- 1 tsp pure vanilla extract

Put the milk, sugar, corn syrup, baking soda and salt in a large heavy- duty saucepan.

Place over medium heat and bring just to a boil. Watch carefully and as soon as the milk begins to foam up, stir with a heatproof spatula or wooden spoon (I used a whisk), and reduce the heat until the milk is just at a low rolling boil.

Continue to cook the milk, stirring the sides of the saucepan frequently until the mixture become very thick and sticky and caramel colored (about 40 to 60 minutes).

It is important to stir the milk so it doesn't burn. Adjust the heat as necessary. Remove from the heat and strain if necessary (I didn't do it and it turned out fine).

Stir in the vanilla extract.

Let cool before covering and storing.

This will keep in the fridge for up to a month.

For the Dulce De Leche buttercream: (www.bakespace.com)


This makes enough buttercream to cover a two layer 20cm cake and to decorate it.

Ingredients:
- 2 sticks of softened unsalted butter (1/2 cup)
- 4 cups of sifted icing sugar
- 1 can of Dulce De Leche (4 to 5 tablespoons of homemade one)
- 2 tsp of pure vanilla extract (I didn't use it since I had already put some vanilla in the Dulce De Leche and this was to go with a chocolate cake anyway)

- Approx 1/4 cup of heavy cream or milk (I used milk in mine)
- A pinch of salt

Cream the butter.
Slowly add 2 cup of the sifted icing sugar.
Add the vanilla (if using) and half of the cream/ milk.
Mix until well incorporated.
Add half of the Dulce De Leche.
Mix until blended well.
Add the remaining cream/ milk.
Add the remaining Dulce De Leche.
Blend well.
Add the salt.
Continue with the remaining 2 cups of sugar until you reach the desired consistency. Depending on your desired consistency. You might use a little more or less of the sugar.
Mix on medium for about 4-5 minutes. Keep your eye on this as it mixes and DO NOT over mix as the mixture can become grainy.


Assembly:
Place one of the chocolate sponge on the serving plate. Pour approx 5 tablespoons of Dulce De Leche and spread it over the top of the cake.
Place the second cake on top. Place it in the fridge for the Dulce De Leche to stick both cakes together (especially if it's warm). I didn't do it at first and when I covered the cakes with buttercream the cakes kept sliding which made it quite difficult.
Once you are confident the cakes are not going to move too much, remove it from the fridge and pour 3/4 of the buttercream on top of the cake. Spread to the sides.
Fill a pipping bag with the rest of the icing to decorate. I used the Wilton tip 2D (I actually wanted to use the 3M to make big roses but I was running out of time and couldn't find it so I had to improvise). I added some Maltesers on top but you could drizzle some more Dulce De Leche or leave it as is.
And Tadaaaaa, here is the final result (again). I hope you enjoy making this cake and especially eating it. Happy Baking Everyone :)