Saturday, 5 May 2012

Banana chocolate roll


Ok I admit this is not much of a recipe but if you crave a warm chocolatey dessert (that is gluten free as well) this is for you.
I had made some buckwheat crepes earlier in the week and froze them. They do freeze well however I had folded them and they broke at the fold so next time I will freeze them flat. You can find the recipe here: http://thebakingfrog.blogspot.co.nz/2012/05/gluten-and-dairy-free-stuffed-crepes.html.

I spread each one with the nut and dark chocolate butter I had made earlier as well (http://ohsheglows.com/2011/01/12/4-ingredient-dark-chocolate-almond-butter/) but any type of spread is ok.

I rolled the banana in the chocolate spread crepe and put them in the oven for 20 minutes at 180C. The edges became crispy and the banana was nice and soft in the middle.

I then melted some more chocolate in the microwave (I used Toblerone) and drizzle (or slapped) it on the crepes.

You should have seen the joy in my son's eyes when he realised that was dessert. Apparently I was not being fast enough with the fork feeding him so he would just reach his little hand and was grabbing some pieces himself.


My husband's verdict: he needed at least another 6 servings to be able to tell me if he liked it or not (He! He!) and it would have been even better with vanilla ice cream....

Happy Baking everyone :)

Thursday, 3 May 2012

Short pastry for savouries

Slice of vegetable and ham quiche


When it comes to pastry I generally refer to my bible: The Edmond's cookbook. Everyone should have one of those at home. The pastries are just divine (and I am talking from experience from before I was gluten free). So tonight I got if off the shelf and made a beautiful short pastry.

Ingredients:
- 2 cups of all purpose flour
- 1/4 tsp of salt
- 125g of cold butter
- 1 cup of cold water

Sift the flour and salt together. Cut in the butter until it resembles fine breadcrumbs. Mix to a stiff dough with a little water. Roll out very lightly and do not handle more than necessary.

Place in your dish and blind bake at 200 Degree C for about 12 minutes. Remove the baking blind material and return to the oven for about 1 minute to dry the pastry out. Remove from the oven, pour the filling into the shell. return to the oven and bake for a further 30 minutes or until the filling is golden and set.

For the filing of this quiche follow the link: http://thebakingfrog.blogspot.co.nz/2012/05/gluten-and-dairy-free-quiche-with.html

Gluten and dairy free quiche with homemade Soy Ricotta

My 2 little quiches
You know that moment of panic when you realise you have taken anything out of the freezer for dinner tonight? Well this is what happened to me. Although I might be luckier than most that I am a stay at home mum of a little monkey who decided to sleep for two and half hours this afternoon leaving me time to make 2 types of pastries and a homemade soy ricotta. I have to admit that I imagine the ricotta to turn out so badly that I didn't take any pictures of it but next I certainly will. It is really easy to make and can, of course be made with cow's milk. I am actually thinking of trying it again with goat's milk (watch this space).

For the soy ricotta I inspired myself from this website: http://www.101cookbooks.com/archives/000282.html.

I just heated up 1Litre of soy milk and added 4 tsp of white vinegar to it. I let it boil to 80 Degree C, took it off the heat, and scooped the curds into a pre- prepared colander lined with a cheese cloth. I let it drip a bit and then hung it on the clothe line outside to cool and keep drying. I left it there for about 15 minutes. I then put the soy ricotta in a container in the fridge until I needed it tonight... Not quite actually, I did spread some on some corn cracker some with salt and dried herbs and others with honey... That was a delicious, easy and quick lunch.

For the pastry. I have used this recipe with a few changes. You can find the original recipe here: http://jeenaskitchen.blogspot.co.nz/2008/01/how-to-make-gluten-free-pastry.html.

- 1 cup of buckwheat flour
- pinch of salt
- 1/4 tsp of xanthan gum
- 2 Tblsp of olive oil
- 1Tblsp of canola oil
- 1 tsp of coconut oil (this made the pastry very buttery tasting)
- cold water

Mix the buckwheat flour and salt well. Add the oil. With a pastry knife or a butter knife mix the flour and oils. The pastry should still look a little dry with lumps.
Slowly add the cold water and mix with your hand. Once you can roll the pastry into a ball, it's ready.

I wrapped mine in some plastic film and put it in the fridge for about 30 minutes.

I blind baked it just before I prepared the filling for about 15 minutes at 200 degree C.

For the filling:
- 1 cup of frozen vegetables (defrosted in the microwave for 5 minutes or less)
- 1 Tbsp of non- dairy butter (I use avocado Olivani)
- 1 cup of ham (cut into cubes)
- 1 Tbsp of rice flour
- 1/2 cup of milk (preferably at room temp)
- 1 egg (beaten)
- Salt and pepper to taste

Melt the butter in the pan. Add the vegetables and the ham. Let them warm up and get coated with some of the butter. Add the rice flour and stir the vegetables and ham so they are coated in it. Add the milk slowly and keep stirring to avoid lumps. Add the egg, stir so it is completely combined. Season to taste.

Place the filling into the shells and bake until set and warm through. For those little ones it took about 20 minutes.

Cut in the middle, before being devoured

I guess it would have been nice with a fresh green salad but it was packed with vegetables so I guess the goodness is still there.

Happy baking everyone :)


This is not a recipe but I am so proud I needed to share

This is my Olive Tree... My husband and I bought this tree about 3 years ago and it has faithfully given us olives every year but generally one or two. It doesn't look like much but I enjoy looking at this tree and dream that I am in the South of France soaking in the warm sun, in an old house surrounding with vines and olive trees. Anyway this is for another time.

Today I have "harvested" the olive tree and we should be able to enjoy them in a few weeks. Here are some pics of my harvest :)

Hope you all have a great day.


Wednesday, 2 May 2012

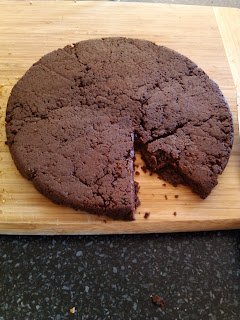
Gluten and dairy free chocolate almond giant cookie or the accidental success

It almost looks like a brownie only crunchier

Does this look like a good and tasty cookie? and I can tell you it tastes good. This cookie however has a story, it was not born a cookie, its destiny was meant to be an almond and dark chocolate butter. Yes, you read correctly, it was meant to be a nut and chocolate butter.
So where did it go so wrong? (well actually once I tasted the finish product I was wondering where did it go so right?) The simple answer is a food processor that is not strong enough to process nuts into butter, pure and simple.
So if you want to make the delicious cookie here is how (if you want to make the almond and dark chocolate butter AND you have a strong food processor you can try this one: http://ohsheglows.com/2011/01/12/4-ingredient-dark-chocolate-almond-butter/).

- 2 cup of raw almonds
- 3 Tbsp of sweetened drinking chocolate (I use Fair Trade)
- 1/4 cup of flaxseed oil
- 2- 3 Tbsp of coconut oil
- 1/4 cup of milk or water (see instructions)
- 1 tsp of pure vanilla extract
- Agave nectar or honey if you want it a little sweeter

Preheat the oven to 150 C Degree. Prepare the almonds onto a baking sheet and roast for about 20 minutes. Note: you will still need the oven to bake the cookie so you might want to keep it on.

Once fragrant, take them out of the oven and leave them to cool a little.

Place them in your food processor and pulse until it looks like sand (or the dough for the base of a cheesecake). Add the drinking chocolate and pulse again until well combined. Add the oils and pulse to combine. Add the vanilla and agave or honey if it tastes too bitter. If the texture still looks too dry (ie it doesn't stick together when you pinch it in between your fingers), add some of the milk or water otherwise leave it out altogether.

Preheat your oven to 200 C Degree.

Press it into a round cake dish ( I used a 20 cm one) and put the cookie in. Bake for about 20 minutes. When you take it out, the cookie will still be soft. Leave it to cool and the outside will harden enough to become crunchy.

I have to say this is one of my kitchen "accidents" I am pretty happy with. The only other mistake I have made is that I have left the cookie on the benchtop and every time we walk past it we pinch a little (or a big) piece.

Happy baking everyone :)
Thebakingfrog.blogspot.co.nz
After 5 minutes out of the oven


9pm tonight (looks like a good half still)

Update on the nut and dark chocolate butter: I have made another one which is much easier to spread although still not as smooth as in the original recipe... I guess I will need to look for a new food processor and leave those recipes to the side for now.

If you have any tips on making nut butter with a weak food processor please do share.

Tuesday, 1 May 2012

Toblerone crinkles

I saw those cookies on many baking websites and I always wanted to try them. For some reason I thought they were very difficult to make so I kept putting it off. The most difficult thing is in fact the wait. Those aren't really biscuits you can make in a dash when an unexpected guest is at your door. They need to rest in the fridge to be able to roll them into balls before baking them. But I get ahead of myself, here is the recipe from one of my favourite baking site: Joy of baking. There is even a video: http://www.joyofbaking.com/ChocolateCrinkles.html.

The only difference is that I used the massive Toblerone my sister- in law had given me. It also added texture to the cookies because of the pieces of nuts in the bar.

Ingredients:
- 4 Tbsp of unsalted butter
- 230g of Toblerone
- 1/2 cup of granulated white sugar
- 2 large eggs (I used size 7)
- 2 tsp of pure vanilla
- 1 1/2 cup of all- purpose flour
- 1/4 tsp of salt
- 1/2 of baking powder

Topping:
- 1 cup of icing sugar


In a heatproof bowl, place over a saucepan of simmering water, melt the chocolate and butter. Remove from the heat and let cool to room temperature.


In the bowl of an electric mixer, fitted with the paddle attachment, beat the eggs and sugar until thick, pale and fluffy (about 3 to 5 minutes). Then beat in the vanilla extract. Add the cooled chocolate mixture and beat until incorporated. 


In a separate bowl whisk together the flour, salt and baking powder. Add the dry ingredients to the chocolate mixture stirring just until incorporated. Cover with plastic wrap and refrigerate until firm enough to shape into balls (I left mine overnight).

When ready, preheat the oven to 325 F or 165 C and place the rack in the centre of the oven. Line two baking sheets with parchment paper.

Place the icing sugar in a shallow bowl. Roll the chilled dough into 2.5cm balls and roll each ball in the sugar. Make sure each ball is completely coated, with no chocolate showing through. Place the sugar covered balls on the prepared baking sheet, spacing about 5 cm apart.

Bake cookies for about 8 to 10 minutes or just until the edges are slightly firm but the centres are still soft.


And the result is:


The ones on the last pic are tiny ones I have made for my son. Needless to say they were enjoyed by many, including my niece and nephew. 


Happy Baking everyone :)

Stuffed crepes (with gluten)

Here is the gluten version... Leftover chicken soup stuffed crepes.

For the crepes:
- 2 cups of all purpose flour
- 1 tsp of salt
- 1 cup of buttermilk (1 cup of soy milk with a tsp of vinegar)
- 1 cup of soy milk
- 2  Tbsp of oil ( I used Canola oil)
- 1/2 cup of water (only if needed).

mix all the dry ingredients together. In a jug, mix all the wet ingredients together. Pour the wet ingredients with the dry ingredients. Mine looked very liquid but it cooked nicely.
Heat a non stick frying pan and  spray with oil or melt a little nob of butter. I used 2 big tablespoons of batter for the size of my pan. Cook the first side until you can easily lift up the crepe, around 2 minutes, flip it and cook for another minute or 2.


You can find the rest of the recipe on this link and feel free to post some ideas for fillings: 
http://thebakingfrog.blogspot.co.nz/


My little Dude loved it and almost cleaned his plate. The portion might have been a little big.

Happy Baking everyone :)